Showing posts with label #DIY Projects. Show all posts

19.4.20

HOW TO BUILD A GEODESIC DOME ~ ORGANIC SUSTAINABLE LIVING

I  have this re-occurring dream where I see myself strolling out to our backyard and picking the best tasting, fresh, organic, nutritious, chemical free, non GMO fruit, vegetables and herbs all year-round. 

Then....... I wake up. !!


As you know, my husband and I live in Pickering, just outside of Toronto, Ontario, Canada which translates weather-wise into a climate of months and months of cold weather and snow, making our growing season quite short.

Sustainable Living by growing your own food has so many incredible benefits. The following are just a few........... 

  • It is a wonderful way to support the environment. So much of the food that we eat has had to travel long distances to get to our supermarkets.  Just think about all those carbon emissions  as a result of their transport and how that negatively contributes to climate change.  
  • It is a wonderful way to support your well-being - Freshly harvested food grown in nutrient-rich soil in your own backyard means that you are consuming more vitamins, minerals and enzymes which means better health for you. Food which has traveled long distances to get to us loses so many of these vital nutrients.
  • It has therapeutic advantages; Gardening is relaxing to the mind, requires some physical exercise and the entire process of growing your own food is pleasurable and fulfilling. 
  • It reduces your monthly food bill 

So, in an attempt to support our goals of living a truly healthy and sustainable life, I have been researching for quite some time now, a manufacturer/supplier or instructions on how to build a geodesic dome greenhouse  for our backyard. There are many manufacturers out there, but not all have a quality dome structure which will withstand our Canadian winters and snow. You will also come across loads of websites with instructions on how to build one from scratch.

Now you know we love a DIY project and will attempt to build anything ourselves if  at all possible, but sometimes as they say, "you have to know when to HOLD THEM AND KNOW WHEN TO FOLD THEM!"

We decided that we did not want to go the DIY route with this project, by following some obscure directions found on the internet. Our greenhouse will have some DIY elements for sure as we will be constructing it, but from a purchased kit which includes all the necessary materials for a perfect result. 

We want to build this correctly the first time as there really is quite a science to the Geodesic Dome Greenhouse design. 

Firstly let me tell you a bit about a Geodesic Dome Greenhouse as most people have never heard of them. It is a spherically designed greenhouse structure as opposed to the typical rectangular shape like most greenhouses. A Geodesic Dome Greenhouse is constructed from a number of triangular forms made from wood struts and metal hubs and covered by polycarbonate glazing panels which fit together to create the dome shape. The beauty and benefits of this shape are many; the dome can withstand very high winds, the snow slides right off, they are extremely energy efficient and requires little or no heat.


During my research,  I found this incredible company in Colorado called Growing Spaces who have been designing/producing Geodesic Dome Greenhouses for about 25 years.  There are many, many geodesic dome greenhouse manufacturers but in my opinion they pale in comparison to the Growing Spaces dome.

They have a variety of sizes and packages to suit your particular needs. Their smallest greenhouse kit is 15 ft. which includes a covering of UV resistant, shatter-proof polycarbonate glazing panels, a set of pre-cut, color-coded struts and framing. Features like automatic opening vents, solar powered undersoil heating/cooling system, Reflectix insulation, materials for the pond and a shade cloth are included.


Plus ~ for climates such as ours there is a a snowshed entryway that has a door with a window, all hardware, and a 24" foundation wall with structural siding. 


 Here are a few other pics all courtesy of Growing Spaces.


Pretty incredible, don't you think?

Can you see yourself building a Geodesic Dome Greenhouse? 

Can you imagine having your own abundant supply of organic, fresh produce just steps away, in your backyard all year long, even in the winter months?

Can you imagine being truly sustainable and enjoying greater health and wellness?

We surely can!!

Please visit Growing Spaces for more information.

Soulier Design Studio specializes in Sustainability, Eco Friendly Design, Products and Lifestyle.


16.5.15

HOW TO TRANSFORM A SCHOOL BUS INTO AN RV


Bears became an issue at our vacant 5 1/2 acre property that we owned in Haliburton.  We just loved to spend weekends up there and had been roughing it in a tent.  I actually couldn't believe that I (I am a city girl to the core, high heels and all) actually stayed in a tent.  Roughing it to me is a black and white TV while staying at a Holiday Inn.  Anyway, we started looking at used RV's, trailers etc. to stay in during our weekend sleepovers and they were all filthy, rotting, moldy and just plain disgusting to be blunt.

My husband Joe suggested that we convert a school bus into an RV.  I initially thought that he was out of his mind but after some research discovered that this is quite a common project.  We started looking on Kijiji and Craigslist and alas found our RV in the rough and boy oh boy was it rough.


Here is an Exterior before picture


And Interior


Hey I wasn't kidding was I??????

We worked each evening for about a month and a half and finally finished our new safe from bears condo on wheels to place on our little piece of paradise.  Oddly enough our street name was Shangri-La and was it ever an oasis !!!!!! So pristine as is the rest of Haliburton and the Kawarthas. For those of you not from my area this is a very popular cottage area. We used all recycled materials that we found on Craigslist or garage sales with the exception of the kitchen tiles which we purchased quite inexpensively. 


Due to the Ministry of Transportations guidelines, we had to change the exterior colour from yellow as this was exclusive to School Buses. We decided on green to blend in nicely with the greenery of the trees on our property and after all this was a GREEN project.


Here is the interior very close to completion. For privacy we installed mini blinds for the windows.  This queen sized pull out couch is for overnight guests with our bedroom located at the rear of the bus.  The room directly behind the wall of the banquette is the bathroom with an envirolet toilet, sink and recycled dresser used as the vanity.  The kitchen is just opposite to the banquette.  

We would bring our laptop to watch DVD's or listen to music for those rainy days and for evenings. A propane bbq was used to prepare meals.


Many glasses of wine were enjoyed just sitting outside by the roaring fire enjoying life!!!!


WOULDN'T YOU AGREE, this is RE-TREASURING AT ITS ABSOLUTE FINEST? !!!!


This is a condensed version of our adventure, but if you are interested in the longer version please visit http://www.freewebs.com/lovebugproject  a website I created to document our Bus Conversion.

Soulier Design Studio specializes in Sustainability and Eco Friendly Design, Products and Lifestyle.  

http://www.soulierdesignstudio.com

18.12.14

A SNOWMAN CHRISTMAS TREE | DIY| HOLIDAY

While sitting in my Orthodontists waiting room this week, I was absolutely delighted while taking in all the Christmas décor.

I love, love, love their Christmas tree which has been decorated to look like a snowman ~ FROSTY!!

I snapped a few pics to share with you.


How very creative, don't you agree?

Soulier Design Studio specializes in Sustainability, Eco Friendly Design, Products and Lifestyle.


25.11.14

PINCH ME~ I HAVE MY OWN LIVE EDGE TABLE!! | SUSTAINABLE INTERIOR DESIGN | NOVEMBER 25

Ahhhhhhhhhhhhhhhhhhhhhhhhhhhhhhhhhhhhhhhhhhhhhhhhhhhhhhhhhhhhhhhhhhhhhhhhhhhhhhhh!

That is me screaming! Recently we, picked up our custom-made, beyond gorgeous 86" x 48" x 2" solid black walnut live edge table.

Getting it into our house was quite a challenge due to its size.  Hubby and 2 men wrestled with this incredibly heavy, probably 200 lb table to get it in our front door. I was navigating and it still almost didn't happen.

It is absolutely HUGE and we love it and still can't believe we have one!!


If you have been following the De-sign of the Times blog for awhile, you will know that I am crazy in loooooove with live edge tables and have been wanting one for quite some time. I just never, ever imagined that we would purchase one due to the exorbitant price $$$$$$$ tags. For the size we wanted, I have been quoted prices ranging anywhere from $7000.00 - 18,000.00 yikes!!!!  

So, while researching suppliers, my husband came across a company in Cambridge, Ontario called Galt Wood Co.  I gave them a call and spoke with the owner and Head Builder, George Hollinger. This guy is incredible! I told him what we were looking for, what size we wanted, that we preferred Walnut and then asked him for a quote while holding my breath. His price was amazing and we ordered our live edge table right there and then.

I asked George, how much was required for a deposit and the method of payment.  He responded, "I don't require a deposit."  Huh?  Just the good old-fashioned business model called TRUST.  Love it!!! 
Here is a quote from their website,

"From massive live edge slabs to 100+ year old barn beams, The Galt Wood Co uses the most unique materials to create gorgeous one of a kind furniture pieces.

We work with you to bring your dream furniture into a reality. We walk you through the process of selecting a wood species, choosing styles, and figuring out dimensions. All our furniture is hand made to your specifications."

And a few samples from their exquisite portfolio of work


We were given a date of 4 weeks for our table to be ready for pick up.  In the meantime, we drove out to Cambridge to deliver the legs that had been on our Duncan Phyfe table.  They would be refinished, stained and attached to our new table.  My personal design style is contemporary but I sometimes like to throw a little old in there for some visual interest.  George, didn't think the style would work as he typically likes to use steel bases on the live edge tables but he thought the Duncan Phyfe legs looked great.


Here is a pic of the legs being installed. A long piece of heavy metal was placed between the legs to support the table. 

In an attempt to reduce our own carbon footprint and to also live a simpler life, we moved into a small home several years ago.  Living in a smaller home means that many of our rooms I have had to design to serve multi-purposes. One being our kitchen/dining room. When I was planning this room, I didn't want it to look too kitcheny,(I know that is not a word, but you know what I mean!!) We don't have a dining room, (many dining rooms are under utilized anyways in my opinion) so I wanted a huge good for everything table that could seat 10-12 at dinner comfortably, could be used as a board table to meet with clients and suppliers, a table where I could lay out fabrics, floor plans, blueprints, mood boards, play cards, use for sewing and making crafts etc.  Well this table fits the bill perfectly and because it is constructed out of walnut which is a very, very hard wood, it is virtually indestructible. Sustainable furniture has fine workmanship and is built to last. We will NEVER have to purchase another table and this will certainly become an heirloom.

To compliment our new table, we built a very long banquette from scratch and framed a large unframed piece of mirror to hang behind the banquette.  This was all part of a Nightmare Design Dilemma which has been driving me nuts for awhile. (Stay tuned for that post). I will also post some DIY projects on how we built our banquette and mirror.

Saturday night we hosted our first dinner party at our new table and banquette.  Everyone was very comfortable and had tons of elbow space. It felt like we were at a restaurant.

Here are a few pics of our table.


We particularly love this side of the table where the very large knot is emphasized and curves out at that point. It adds such visual interest and is quite a conversation starter. This picture also shows how the live edge was finished on an angle and smoothed out.


This shot gives you view of the Duncan Phyfe legs that were added as well as a pic, although not a great pic, of the banquette we built.


If you looking for a Live Edge Table, we would highly recommend Galt Wood Co. I can guarantee, you will not be disappointed.

If you would like to take advantage of a designer discount on your table, please contact Soulier Design Studio in advance and we will refer you as our client.

Love to her what you think of our table!!

Do you have a Live Edge table and pics that you can share?

Soulier Design Studio specializes in Sustainability, Eco-Friendly Design, Products and Lifestyle.

Please visit us at 

https://www.soulierdesignstudio.com

13.8.14

A WELL - DRESSED DVD | DIY TUTORIAL | AUGUST 13

Recently, I have been absent from my blog as I have been quite busy producing a video/picture slideshow. This video was presented to our family and closest friends at A Celebration of Life we hosted to honour my niece this past weekend. My niece passed away a short time ago, after a brief but courageous battle with Colon Cancer. Although she was my niece, we grew up like sisters due to the closeness in our ages. Our family is so completely devastated by her loss.

I have spent countless hours working on this DVD, making a picture story to Celebrate her beautiful life.  This was by far one of the most difficult and emotional projects I have ever completed but the video is wonderful.  I am very happy with the end result and so was our family and friends. I burned extra copies to be given as a special gift for family and dearest friends.

My dilemma though, after completing this video which highlights the life of the most beautiful and kind human being to have ever graced this planet and who has touched the lives of so many was; what will I present this Memorial keepsake DVD gift in? It also has to beautiful.  There is NO WAY that I would be presenting it in the plastic jewel case the DVD came in! NO WAY!!

I searched and searched the internet for ideas and I finally stumbled upon this great website to find exactly what I was looking for and the absolute perfect solution. I love, love, love this idea and I am sure you will too!!

My niece was crazy about daisy's and her favourite colour was purple so this was the inspiration for the project. Get the details below of how to make this gorgeous jacket which can be completely customized (the sky is the limit) which holds the CD/DVD.

Instructions;


Once you have reached the website you will find a number of templates to choose from.  I chose the CD Cover template. 

You will be prompted to fill in a few fields.  First step is to upload a picture or artwork into the middle square. I uploaded the daisy picture shown above for my project. There are some cropping options which enable you to display your picture perfectly. 

Next - complete the fields named Title and the other is Text which will print below the Title.  See example above. Title is - A Celebration of Life ~ (name of my niece has been blurred for privacy) and then below is the date of the Celebration.

Next Click Download - I saved the image to my desktop. This will save your project as a jpeg.  Now print off your template. The picture above is my printed template. 

Before we go any further, I would like to give you a few words of advice - I decided to go to my local office supply store and purchase a heavier photo paper with a sheen to print my template on.  I reasoned that the heavier paper would protect the DVD contents and the photo paper would yield a beautiful image. WRONG, WRONG, WRONG and SO TERRIBLY WRONG!  The image turned out all streaky and the colour was completely off and totally not acceptable.   

Oh great, now what do I do ????

I decided to print the template onto the regular paper stock in the photocopy machine. Which turned out beautifully by the way but when it was time to cut the template out, I doubled up the printed template on the regular weight paper above with the heavier paper I purchased behind to give it a cardboard stiffness needed to protect the DVD.   Voila!! Just Perfect.


Another little tip - Fold along the fold lines first prior to cutting out the out the template, otherwise you will be cutting off the fold lines as well.


Look closely ~ you can now see the two pieces of paper.  I used a glue stick just at the top of each curved area to bind them together. Worked like a charm!


Here is the front side.


Now fold in the side flaps first, then the bottom and finally the top which has the Text. At this point you could just use a resealable sticker to keep the cover closed.  I chose a sticker and a purple ribbon.

Here is the back.....


And the Front....


This would be a great way to present a wedding picture DVD, a baby shower picture DVD, a special birthday party DVD, you just customize it to whatever fits your event.

I am very happy with the way this turned out. Such little effort for such a beautiful Memorial gift presentation.

Just a tad nicer than the plastic jewel case wouldn't you agree??

Soulier Design Studio specializes in Sustainability, Eco-Friendly Design, Products and Lifestyle.

Please visit us at 

https://www.soulierdesignstudio.com 

17.11.13

GRAND ENTRANCES AND FIRST IMPRESSIONS!

Currently, temperatures are not too cold making this the perfect time to begin exterior holiday decorating.  Stringing Christmas lights and making decorative urns/wreaths is so much easier when your fingers are not frozen!

I thought I would share with you, some fairly easy DIY projects to help make your home look festive and inviting for the Holiday Season!!

I have been making these swags for the past few years for my front door instead of a wreath.  They are a super easy and chic way to make a great first impression.
 

Photo | courtesy of Good House Keeping
 
With some floral wire, marry some fragrant greenery — yew, holly, spruce, and eucalyptus.  I use some craft glue and a wooden sticks/skewers to glue the ornaments on. Then push the skewers into the boughs.  Use some fabulous bow tied satin ribbon to finish and Voila an amazing swag for your door or windows.  If you have all the supplies at hand, this can be made in 1/2 an hour!!


Photo | Courtesy of Old town Home Pinterest

Love this idea and super easy to make using magnolia leaves, greenery, ornaments and a bow. 


Photo | Courtesy of Pinterest
 
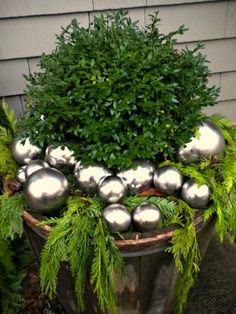
This super easy DIY double duty urn can stay out for the Holiday Season and continue to welcome guests all winter.  A wooden urn has been used in this picture, some boxwood, shiny ornaments and some cedar boughs. 


A Fabulous Urn at Sheridan Nurseries.

Chock full of greens, hydrangeas, berries.  As you can see, this would not be a difficult DIY project. The key is a lovely urn or pot of your choice and then layers of different types of greenery, berries, flowers, pine cones and ornaments for texture. Then add some height and visual interest with dogwood branches, long twigs or fallen birch.  


Here is another which is quite similar but with the addition of some birch and colourful ornaments.


I do this same type of thing but in window baskets. Luckily, I have a forested area behind my home and can collect everything I need for them. Bonus! Here is the tutorial for these baskets.


Photos | Soulier Design Studio

Loved this magical tree.  Price tag........ $6999.99 Yikes!!

Needless to say, that even with my designer discount, this did not come back to the Studio with me!

Sheridan Nurseries is definitely the perfect destination for all of your Holiday Decorating. They stock every type of greenery imaginable as well as, birch, boxwood, pine cones, wreaths, Christmas Trees and decorations, urns, lights etc. This afternoon, I spent a lovely couple of hours with a friend browsing this spectacular Winter Wonderland! 

Soulier Design Studio specializes in Sustainability, Eco Friendly Design, Products and Lifestyle http://www.soulierdesignstudio.com 

28.10.12

DIY | PICNIC TABLE BAR

It is a tad late now, but what a great idea for entertaining next summer! 

It is a really easy DIY project. Just remove one board or plank from your tabletop and add a metal trough. Add ice and your favorite drink and voila, instant bar. 

Is this a project that you might try?


Soulier Design Studio specializes in Sustainability and Eco Friendly Design and Products


16.12.11

DIY DECORATIVE HOLIDAY BASKETS


HAPPY HOLIDAYS

Here is a fairly easy DIY project for you to try.  A few hours of your time is all it takes.  All of the materials used in this project were collected in the fields near my studio.  Pine cones, dogwood, cedar boughs, berries, birch branches. 

Use your imagination and choose a colour scheme that compliments your home.  Make up a batch of  hot chocolate, pour it into a Thermos and head outside to start creating.  Just keep adding and layering your field finds until your baskets are complete. 


Soulier Design Studio would like to wish you and yours the very best of the Holiday Season.  

Don't forget to send in pictures of your holiday baskets.  We would love to see them!! 

ENJOY our step by step video on making these baskets!!


Soulier Design Studio specializes in Sustainability, Eco Friendly Design, Products and Lifestyle 

http://www.soulierdesignstudio.com


19.10.11

TAKING IN THE SUMMER HOW WONDERFUL!

Happy Fall! 


I had a great summer.  How about you?  The weather has certainly co-operated. I spent glorious days and nights in the backyard gazebo, drinking my favourite red, having wonderful conversations, enjoying lovely nutritious food, taking pictures of the wildlife that visit us in our backyard (deer, butterflies, birds), smelling the gorgeous flowers that Joe, my husband nurtured and pampered all summer long.

We had some time to really relax and enjoy time with friends, and family.  I am finding that as I get older, my life has become simpler, less complicated, less stressed and so much more enjoyable. I am doing the things that I really want to do.  Love it!!!!

This is Doris our Deer.  She and has been visiting us for the past 2 years and enjoys apples
and carrots.

I absolutely love spending time in our backyard where we are surrounded by conservation on all 3 sides of our home. Complete privacy with Lake Ontario and a beautiful beach right behind us.  It is like being at a cottage up North without the 2 hour drive. 


Joe and I have been working on some personal DIY projects for our home.  Currently, we are working on our bedroom and kitchen.

We decided to make an upholstered headboard which was quite a lot of work but worth every minute. Each night we have spent several hours, covering buttons, tufting, stapling etc. and completed the project within a week.  We are very happy with the results.  We used (2") eco foam, charcoal ultra suede fabric and to give a contemporary feel, pewter nail heads were added.

Our headboard ended up costing 1/10 of what it would have had we purchased it. 

What do you think???


I have ordered a down duvet and new bedding, HOTEL STYLE to add to the luxury.


Once, our bedroom reno is complete, I will upload pictures. 

Do you have any DIY projects that you would like to share???

Soulier Design Studio specializes in Sustainability and Eco Friendly Design and Products http://www.soulierdesignstudio.com 

21.7.11

ALUMINUM LEAFING - NOT AS EASY AS IT LOOKS-YIKES! | DIY

RECYCLE

Continuing our theme of green commitment and the ways that you can incorporate it into your life .............

I have read so many articles/blogs of people recycling/up cycling (I call it re-treasuring) old furniture by either silver leafing or aluminum leafing and decided to give it a try.  My husband and I  had these seriously dated night tables that really needed a face lift.  So off to Curry's Art store I went to buy some Aluminum Leaf.  Aluminum Leaf is less expensive than silver leaf but with the same effect!!! How hard could it be???  With 5 packages and a bottle of sizing in hand, my husband and I raced home to get started on our new project. 


Night table before. CLICK FOR LARGER IMAGE


I decided to lightly sand the surface of the wood and I primed the entire night table in white paint.  So far, so good.  I applied a light coat of sizing and let it sit to allow it to get sticky.  This is when the nightmare began.  I removed the 5 1/2 x 5 1/2 inch square of aluminum leaf from the book I purchased and attempted to put it in place.  Didn't realize that this stuff is like working with cob webs!!! As soon as it touches the very sticky sizing, there is no way possible to remove it in the event that you misaligned it, which by the way, I did over and over and over and over again.  After several hours, buckets of tears, mountains of frustration and a nightable that looked worse than when I started I decided that this was simply not going to happen.  I was sooooooooooo ticked (not the actual word I had in mind if you know what I mean) that I had wasted all this cash on the Aluminum Leaf and it ended up being a complete disaster. 

I had this vision of these night tables finished and sitting on either side of our bed. My wonderful husband said, oh well you tried, no worries, let's just go out and buy some new night tables.  I said well, "let me see if I can just sand this stuff off and maybe we can salvage them by just painting them and adding new hardware".  This is where this dreadfully long story takes a fantastic turn for the better.  I began lightly sanding with a sanding block and found that I LOVED, LOVED, LOVED the new look of the Aluminum Leaf. The ugly overlapping seams between the squares of leafing were now gone and the night table had this wonderful texture.  WOW!!!

Here is the finished nightable.  We added some round marble handles and black square feet for a contemporary feel and VOILA!!!

CLICK FOR LARGER IMAGE


Here is a close up of the top to show the texture effect I was taking about.

CLICK FOR LARGER IMAGE


VERY GREEN, WHAT DO YOU THINK???

Soulier Design Studio specializes in Sustainability, Eco Friendly Design, Products and Lifestyle

  http://www.soulierdesignstudio.com

3.3.11

ANOTHER POLYVORE POSTING - DID I MENTION THAT I WAS ADDICTED??

I am still navigating my way around the Polyvore site. Today, I created a SET called Carrie'd Away which is a nod to the TV show Sex and the City.  I absolutely love this show. Anyway, I had a ton of fun putting this one together.  I have viewed so many SETS that other people have created.  WOW there are so many talented individuals out there!

I have joined a few of the Interior Design Groups on this site where you share each other SETS and comment.

It is a total blast. Check it out.


Halston heritage dress
$325 - pinkmascara.com

Melissa Odabash swimwear
$175 - net-a-porter.com


Jessica Simpson Collection shoes
$98 - jessicasimpsoncollection.com

Cocotay vintage flower ring
$115 - charmandchain.com

Tattoo Art Lips 2 - Sticker Giant
$1.99 - stickergiant.com


Soulier Design Studio specializes in Sustainability and Eco Friendly Design and Products.